CHAPTER 6. FILE MANAGEMENT
I. Introduction to Saving and Loading Files.
A. Saving a CLIENT INFORMATION FILE.
What is a CLIENT INFORMATION FILE?
A CLIENT INFORMATION FILE contains the information specific to a client such as a client’s name, address, and thousands of other items of information you "filled in" as input areas. In addition to your Master Information List, the CLIENT INFORMATION FILE consists of all the information you entered in any highlighted areas of any form for your client, including the check boxes, and highlighted text areas. This information is saved in your CLIENT INFORMATION FILE.
When Should I save a CLIENT INFORMATION FILE?
Save manually whenever you have typed approximately 1/2 page of text in any text box (4,000 characters). (FormPAK™ will automatically save CLIENT INFORMATION FILE before spell checking, after adding or editing property or debt entries in PropertyCalcTM, exiting the program, printing, or starting a new case.)
B. Saving a CLIENT TEMPLATE.
What is a CLIENT TEMPLATE?
A TEMPLATE is an empty "boilerplate" form that can be merged with a CLIENT INFORMATION FILE. Each client can have their own set of "customized" CLIENT TEMPLATES that you have adapted to the client's specific needs. This Save Template AS option allows you to save a CLIENT TEMPLATE.
Selecting the CLIENT TEMPLATE option will cause a CLIENT TEMPLATE to be saved for a current active client. This CLIENT TEMPLATE will be placed on that client's list of custom TEMPLATES, for easy recall in the future.
When Should I Save a CLIENT TEMPLATE?
You should save a CLIENT TEMPLATE when you changed the "boilerplate" language for a specific client. You do not need to save a CLIENT TEMPLATE for a client if you have simply completed information in the MERGED FORM'S highlighted areas, but not made any "boilerplate" language changes.
Whenever you have changed a template, FormPAK™ will prompt you to save the template when leaving that form.
C. Saving as a MODIFIED TEMPLATE.
What is a MODIFIED TEMPLATE?
You have ability to create your own variations of forms for use with many different clients. FormPAK™ makes this easy. Simply select SAVE as a permanent MODIFIED TEMPLATE from the Save Template AS menu. This will save the template portion of the current MERGED FORM as a MODIFIED TEMPLATE. This TEMPLATE will be placed on the MODIFIED TEMPLATE menu for use with any client in the future.
When Should I Save a MODIFIED TEMPLATE?
Whenever you have changed a TEMPLATE for a client that has application to other cases, save the current TEMPLATE as a MODIFIED TEMPLATE. Now you can merge the new MODIFIED TEMPLATE with another client's CLIENT INFORMATION FILE.
D. Naming Your Files
A file name description consists of up to twenty letters and/or numbers with no punctuation. DO NOT add an extension (such as ".DOC") to your file names. FormPAK™ automatically adds them.
CLIENT TEMPLATES are saved on a client's own unique folder. Therefore, you can develop a standard file name for each type of form and save each client's forms with that standard name. For instance, two clients can have their own CLIENT TEMPLATE called "PETITION".
PLEASE SAVE YOUR FormPAK™ FILES OFTEN. IN THE EVENT OF A POWER OUTAGE OR OTHER HAZARD, YOUR CLIENT INFORMATION FILE AND TEMPLATES WILL BE SAVED.
Saving and loading are easy with FormPAK™. To SAVE Client’s Information at any time, click on the ![]() while editing any form:
while editing any form:
 The Client Information Save Button
Your client’s information will instantly save (Your client’s information is also saved automatically by the program, triggered by a number of events). The SAVE option is also available under File, Save.
You may wish to save variations of information for a particular client. Perhaps you wish to propose alternative property division scenarios, or negotiate other issues of the case where two or more outcomes would be acceptable. You can save an unlimited number of scenarios. To save a scenario, click on File, then Save Client As. The Save a Scenario window will open. Click on Save Scenario at the bottom of the window. A second window will open where you can name your scenario by typing in the description box. Click OK to save the scenario.
You should save a TEMPLATE when you have changed the "boilerplate" language for a specific client. To SAVE a template, click on File, then Save Template As…
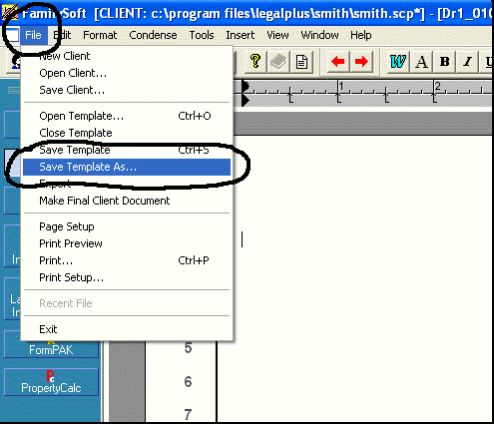
Save Templates
There are two options for saving TEMPLATES. Changes to a template involving information specific to a particular client can be saved as a CLIENT TEMPLATE. You can also save the changes as a permanent MODIFIED TEMPLATE, if you wish to use the changed template in the future other clients.
THE FOLLOWING SECTION EXPLAINS DIFFERENT OPTIONS FOR SAVING YOUR WORK. PLEASE READ CAREFULLY.
SUMMARY OF SAVING OPTIONS SUMMARY:
(1) FormPAK™ will automatically save CLIENT INFORMATION FILE before exiting the program, printing, or starting a new case. Save manually whenever you have typed approximately 1/2 page of text in any text box (4,000 characters).
(2) Save edits to a template as a CLIENT TEMPLATE whenever you edit a STATE TEMPLATE or a MODIFIED TEMPLATE with changes specific to a particular client.
(3) Save edits to a template as a permanent MODIFIED TEMPLATE whenever you edit a STATE TEMPLATE or CLIENT TEMPLATE with changes that you want to use with other clients.
Your client files can be retrieved from the View Client List window. The View Client List button appears at the bottom of the Start screen (this same window can be accessed by clicking File, then Open Client):
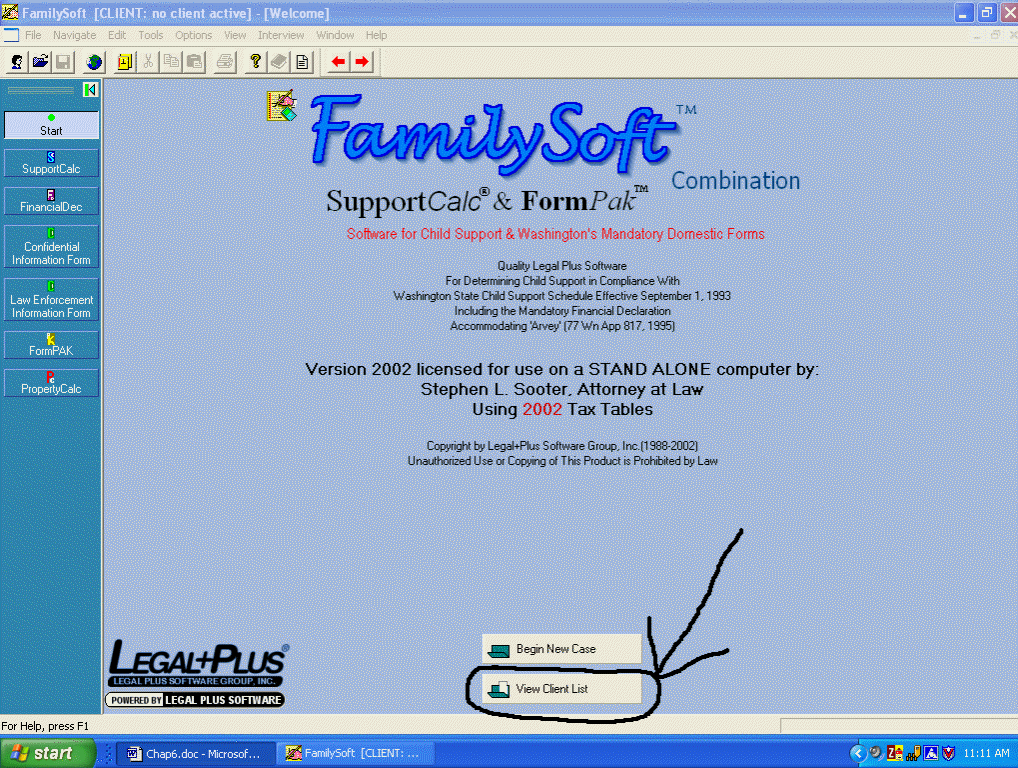
After clicking on the View Client List button, the Client Quick Load window will open:
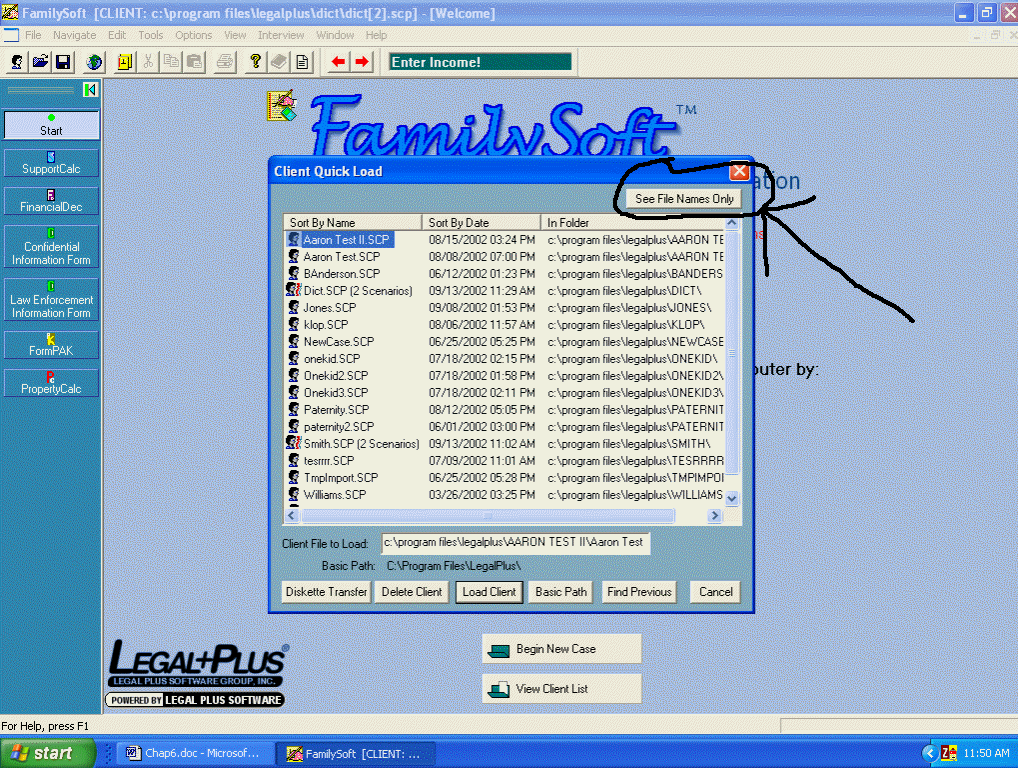
Find the client file you wish to load (they are listed in alphabetical order). Double click to load (or click the Load Client button at the bottom of the screen). By default, the Client List contains date and location information. To list just the names, click on the See File Names Only button (as indicated above) at the top of the screen.
ADVANCED USER INFORMATION: When you BEGIN a NEW CASE, FormPAK™ automatically creates a CLIENT INFORMATION FILE (with extension .SCP) and a CLIENT FOLDER for that new client, as a branch of the BASIC PATH currently in use at the time of creation. (The current BASIC PATH can be seen by clicking on the Basic Path button at the bottom of the Client Quick Load Window) Each time you click on the View Client List button on the Start Screen, FormPAK™ searches the BASIC PATH for all instances of files with .SCP extension, using these files to compile the Client List. When you select your desired CLIENT INFORMATION FILE, FormPAK™ automatically loads that CLIENT FOLDER.
______________________________________________________________________________
- - - - - - - - - - - - - - - - - - FOR PRACTICE - - - - - - - - - - - - - - - - - - - -
To access the Client List, click on the View Client List button on the Start Screen. Client Quick Load Window appears. Select the client file you wish to load, and double click. Your selected client file will load.
VI. The FILE STRUCTURE of FormPAK™ .
The following tree diagram will help identify the placement of files, and to clarify the terms used to identify the file structure used in FamillySoft FormPAKTM.
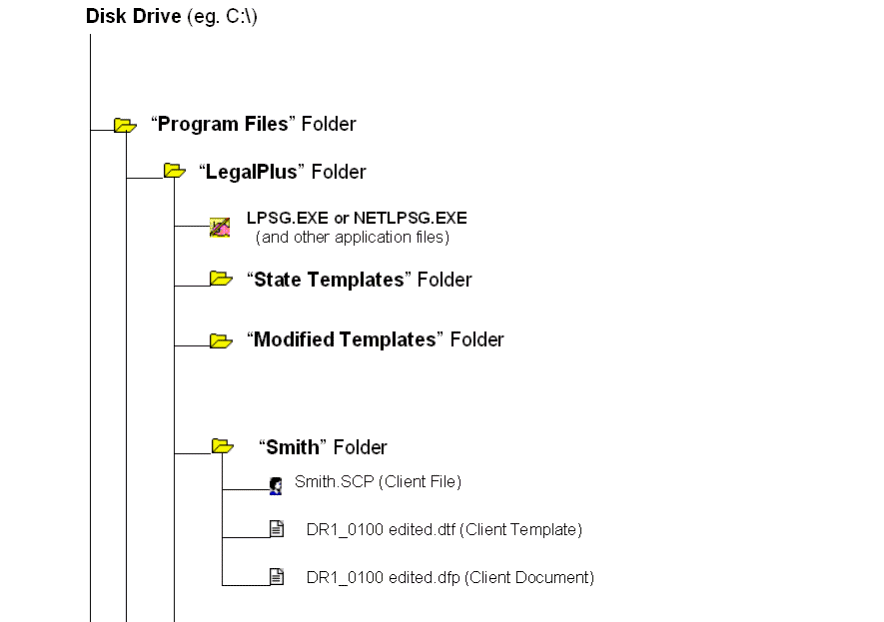
The Basic Path and Client Path can be illustrated as:
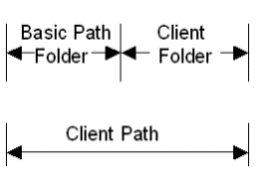
The BASIC PATH is the Drive + Folder upon which new clients are created and stored.
On stand-alone computers, the default BASIC PATH is C:\Program Files\Legalplus. You can, however, change your BASIC PATH to any other drive and path on your local computer, if you wish to save your files there instead.
If you have purchased a NETWORK VERSION of FamilySoft™ you can designate any drive on your network. Set all computers to the same BASIC PATH to allow client file sharing.
If you wish to save to another BASIC PATH, press the Basic Path button at the bottom of the Dialog window before naming your client. A window will open, allowing you to change your BASIC PATH designation. You can also change the BASIC PATH anytime from the View Client List window:
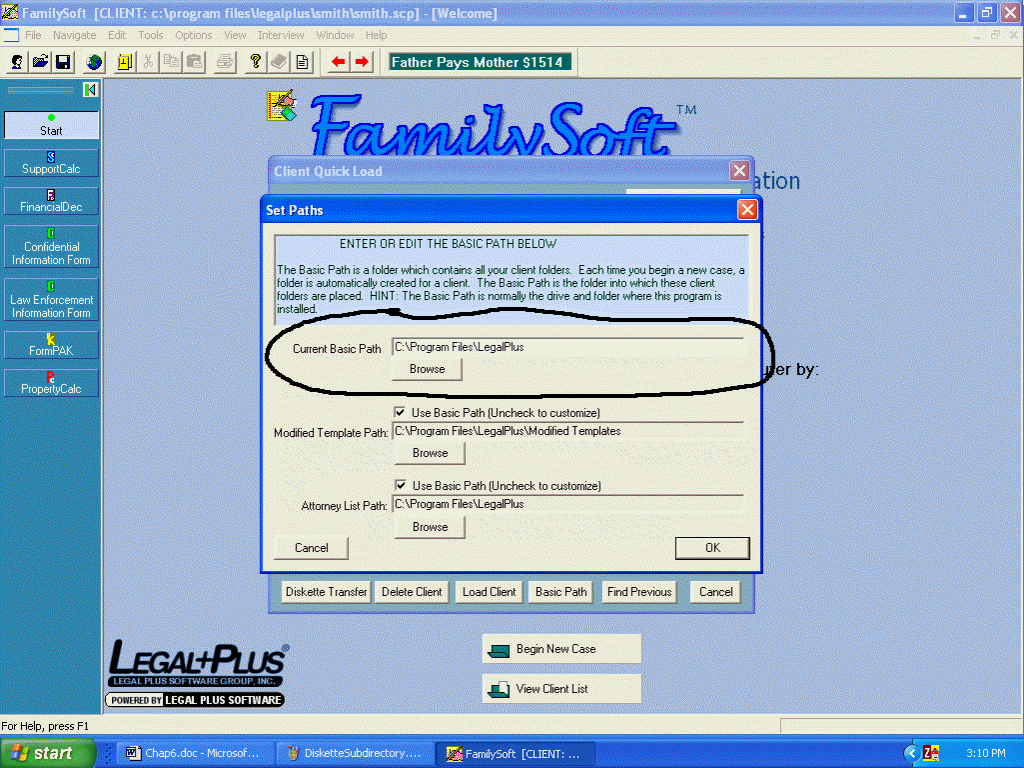
Changing the Basic Path
Caution: Changing the Basic Path designation will also change where the computer looks for your client files, and which client files appear on the Client List. Many times we have had customers call us claiming that their client files were suddenly missing. This happened because they inadvertently changed the Basic Path. Changing the Basic Path back again to the original location caused their client files to suddenly reappear!!
Advanced Users: Note that you can independently designate where Modified Templates and the Attorney List information files are located. We recommend leaving the bottom checkboxes checked, so the Modified Files and Attorney List Information files remain linked to the Basic Path.
A. Deleting a CLIENT Folder.
To DELETE the contents of a CLIENT FOLDER, and remove the CLIENT FOLDER from your computer, do the following:
WARNING: FOLLOWING THESE INSTRUCTIONS WILL PERMANENTLY REMOVE ALL INFORMATION FOR A CLIENT FROM YOUR COMPUTER.
Note: You must have loaded into FamilySoft™ a client OTHER THAN the one you wish to delete. You cannot delete the client you have currently loaded.
(1) From the Start Screen, Click on View Client List.
(2) Highlight the client file you wish to DELETE. Right click your mouse and select Delete Client, or Click on the Delete Client button at the bottom of the window. Your screen will look like the following:
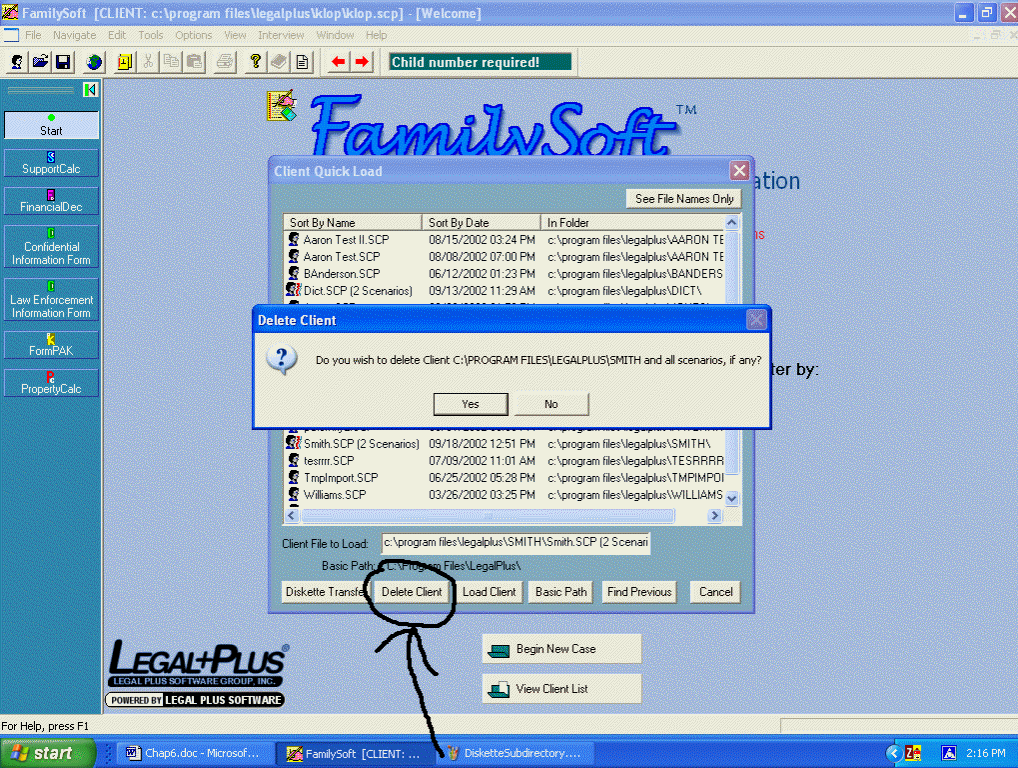
The Delete Client Window
Click YES. Another screen will appear where you must confirm that you wish to delete this client. When you click YES, the client will be deleted. You should see the hard drive light flash briefly as the file is deleted.
______________________________________________________________________________
- - - - - - - - - - - - - - - - - - FOR PRACTICE - - - - - - - - - - - - - - - - - - - -
You must have loaded into FamilySoft™ a client OTHER THAN the one you wish to delete. You cannot delete the client you have currently loaded. From the Start Screen, click on View Client List. Highlight the client file you wish to DELETE. Right click your mouse and select Delete Client, or Click on the Delete Client button at the bottom of the window. Click YES. Another screen will appear where you must confirm that you wish to delete this client. When you click YES, the client will be deleted. You should see the hard drive light flash briefly as the file is deleted.
IX. Deleting a TEMPLATE or DOCUMENT.
To DELETE a MODIFIED TEMPLATE, CLIENT TEMPLATE or DOCUMENT from your computer, do the following:
(1) Load the client file containing TEMPLATES or DOCUMENTS to be DELETED into FamilySoft™ .
(2) Access the client's Template MENU, by clicking on the ![]() icon.
icon.
(3) Highlight the TEMPLATE or DOCUMENT you wish to DELETE by clicking on the appropriate radio button to select the proper group (Modified Template, Client Template, or Client Documents), then selecting the Template or Document to delete.
(4) Right click your mouse, or Click the Delete button at the bottom of the window. Your screen will look like the following:
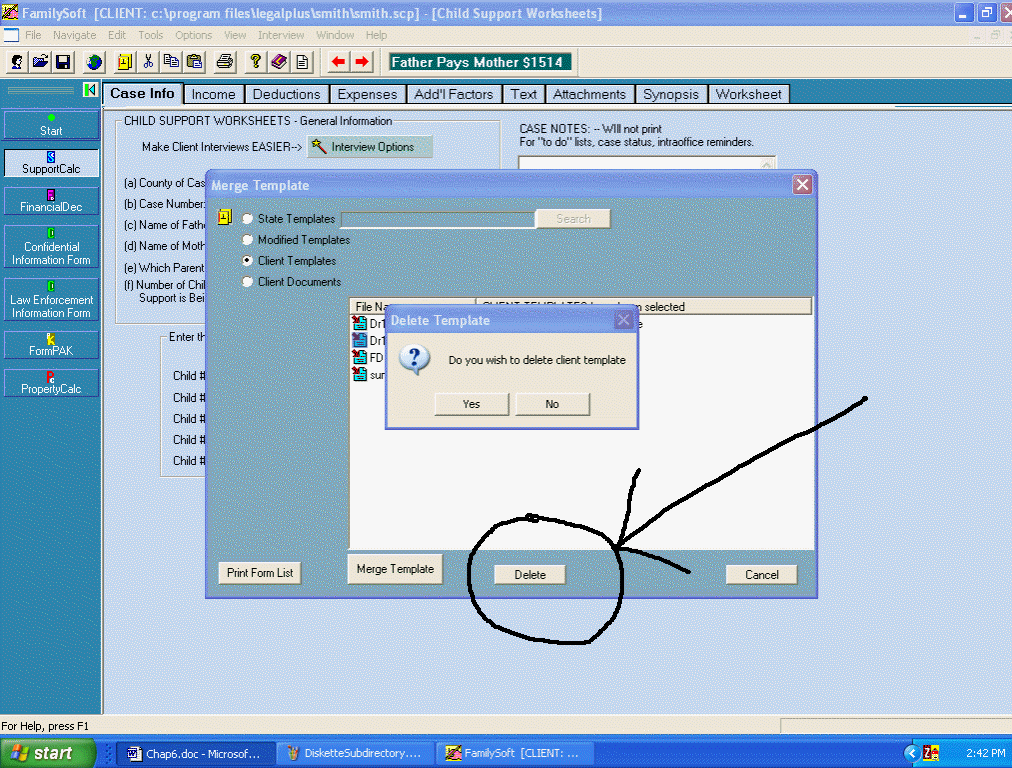
When you click Yes, the Template or Document is deleted. (Caution: You will NOT be asked to confirm!) You should see the hard drive light flash briefly as the file is deleted.
______________________________________________________________________________
- - - - - - - - - - - - - - - - - - FOR PRACTICE - - - - - - - - - - - - - - - - - - - -
To DELETE a MODIFIED TEMPLATE, CLIENT TEMPLATE or DOCUMENT from your computer, do the following: (1) Load the client file containing TEMPLATES or DOCUMENTS to be DELETED into FamilySoft™ . (2) Access the client's Template MENU, by clicking on the ![]() icon. (3) Highlight the TEMPLATE or DOCUMENT you wish to DELETE by clicking on the appropriate radio button to select the proper group (Modified Template, Client Template, or Client Documents), then selecting the Template or Document to delete. (4) Right click your mouse, or click the Delete button at the bottom of the window. When you click Yes, the Template or Document is deleted. (Caution: You will NOT be asked to confirm!) You should see the hard drive light flash briefly as the file is deleted.
icon. (3) Highlight the TEMPLATE or DOCUMENT you wish to DELETE by clicking on the appropriate radio button to select the proper group (Modified Template, Client Template, or Client Documents), then selecting the Template or Document to delete. (4) Right click your mouse, or click the Delete button at the bottom of the window. When you click Yes, the Template or Document is deleted. (Caution: You will NOT be asked to confirm!) You should see the hard drive light flash briefly as the file is deleted.
X. Renaming A TEMPLATE or DOCUMENT.
Giving a NEW NAME to a TEMPLATE or DOCUMENT is a three part process:
(1) Load the original TEMPLATE or DOCUMENT into Forms+PlusTM.
(2) SAVE it, using the new name you wish it to have.
(3) DELETE the original TEMPLATE or DOCUMENT.
XI. Transferring Client Files To/From Diskettes.
A. Copying a CLIENT FOLDER To a Diskette.
You may want to copy an entire CLIENT FOLDER to a diskette. There are two reasons to copy to diskettes:
1) To archive the files to a diskette at the conclusion of a case, or,
2) To transfer a client's files to another computer, using a diskette.
To copy the contents of a CLIENT'S FOLDER to a diskette, return to the Start screen (by pressing the Start button on the left side of the FamilySoft™ screen), then clicking the View Client List button. Right click on the desired client, and select Send To. The entire client file will copy to your diskette drive. You can also use the Diskette Transfer button at the lower left side of the Client Quick Load window as below:
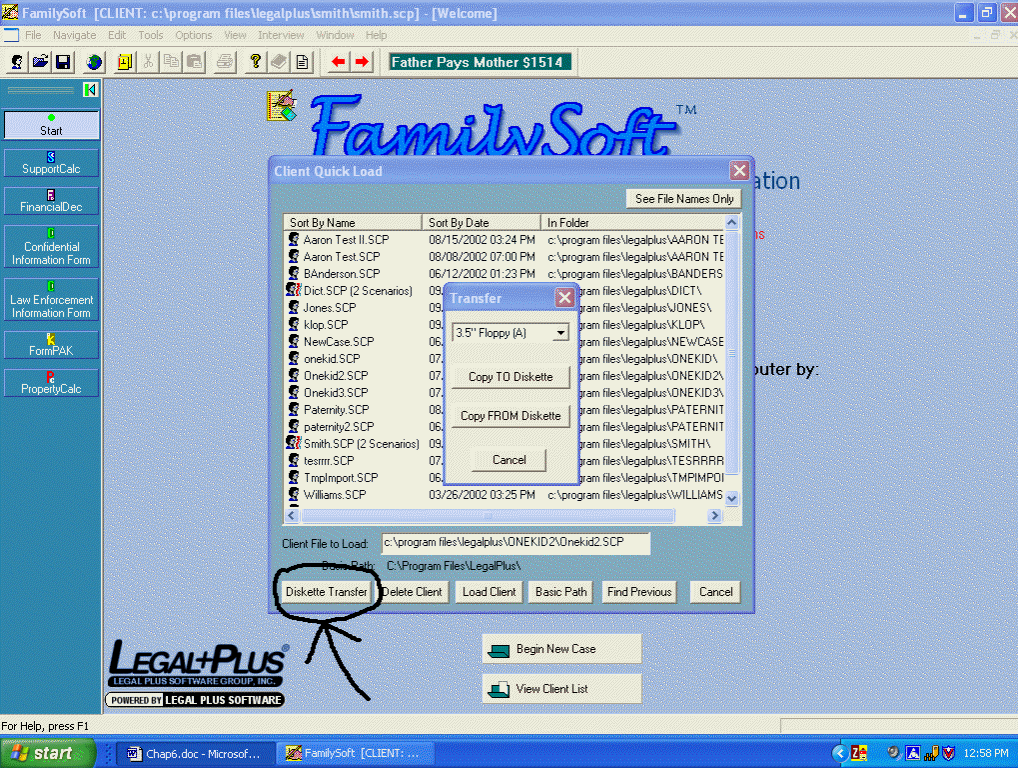
Transfer to Diskette
The Transfer window will open. Then click the Copy TO Diskette button. You will be asked to select the client folder you wish to copy to a diskette, as below:
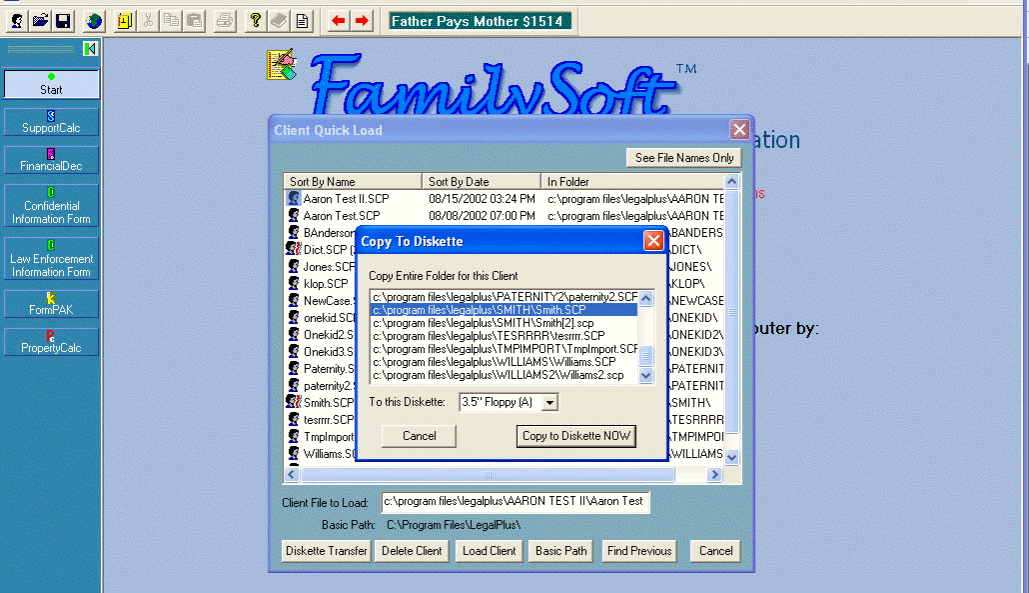
Select the Client folder to Copy
Be sure that a formatted diskette is properly placed in the diskette drive you designated. When you click the Copy to Diskette NOW button, the client file selected will copy in its entirety onto the diskette.
NOTE: FormPAK™ automatically creates a folder on the diskette using the same folder name used by that client's file on the hard drive. The entire contents of the designated hard drive folder is copied onto the diskette, including all scenarios you may have created for an individual client.
You can use the same diskette to contain several client's files, but you must follow the above procedure to copy each client individually.
______________________________________________________________________________- - - - - - - - - - - - - - - - - - - - - FOR PRACTICE - - - - - - - - - - - - - - - - - - - - -
To copy the contents of a CLIENT'S FOLDER to a diskette, return to the Start screen (by pressing the Start button on the left side of the FamilySoft™ screen), then clicking the View Client List button. Right click on the desired client, and select Send To. The entire client file will copy to your diskette drive. You can also use the Diskette Transfer button at the lower left side of the Client Quick Load window. The Copy to Diskette window will open. Then click the Copy TO Diskette button. You will be asked to select the client folder you wish to copy to a diskette. Be sure that a formatted diskette is properly placed in the diskette drive you designated. When you click the Copy to Diskette NOW button, the client file selected will copy in its entirety onto the diskette.
B. Copying a CLIENT FOLDER From a Diskette.
To copy from a DISKETTE to your FormPAK™ program, do the following:
Return to the Start screen (by pressing the Start button on the left side of the FamilySoft™ screen), then clicking the View Client List button. The Diskette Transfer button is at the lower left side of the Client Quick Load window. The Transfer window will open. Then click the Copy FROM Diskette button. You will be asked to select the client folder you wish to copy from your diskette inside the Browse for Folder window:
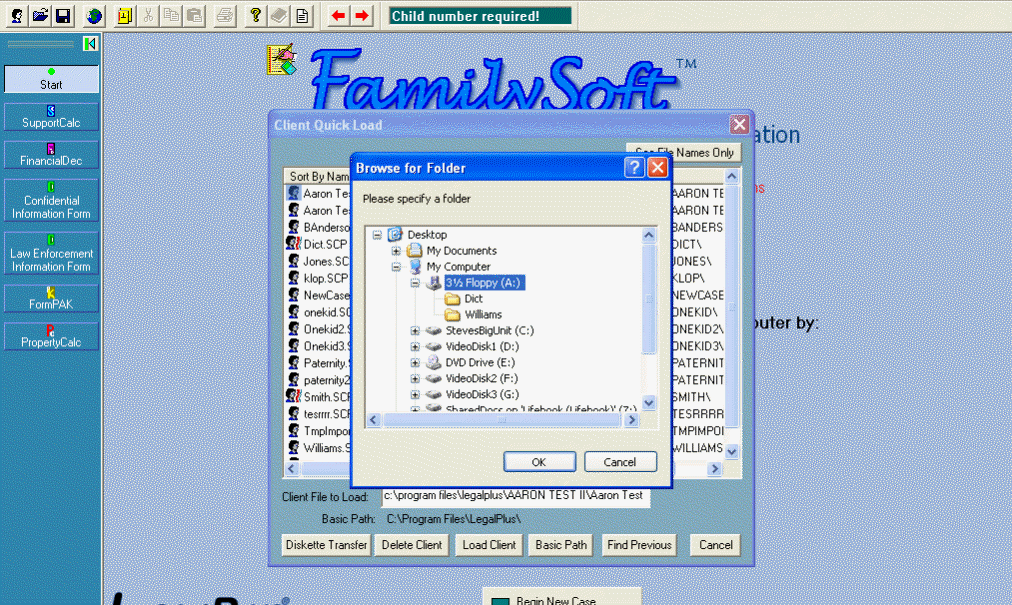
Highlight the CLIENT Folder you wish to transfer. When you click OK, the client file you selected will copy from the DISKETTE to your computer's hard drive.
NOTE: FormPAK™ creates a folder on the HARD DRIVE for the incoming diskette file under the current BASIC PATH. (BASIC PATH must be set to designate a FOLDER on your HARD DRIVE, usually C:\PROGRAM FILES\LEGALPLUS.) The folder created under the BASIC PATH will be folder name used by that client's file on the diskette. BE CAREFUL. If one already exists by that name, the program will ask you if you wish to overwrite its contents. The entire contents of the designated diskette folder will be copied onto the hard drive, including all scenarios existing for the individual client selected.
______________________________________________________________________________
- - - - - - - - - - - - - - - - - - - FOR PRACTICE - - - - - - - - - - - - - - - - - - - - -
Return to the Start screen (by pressing the Start button on the left side of the FamilySoft™ screen), then clicking the View Client List button. The Diskette Transfer button is at the lower left side of the Client Quick Load window. The Transfer window will open. Then click the Copy FROM Diskette button. You will be asked to select the client folder you wish to copy from your diskette inside the Browse for Folder window: Highlight the CLIENT Folder you wish to transfer. When you click OK, the client file you selected will copy from the DISKETTE to your computer's hard drive.
XII. RIGHT CLICKING To Copy/Transfer/Delete Clients .
As an alternative for menus, the functions for Copying, Transferring, and Deleting files can also be accessed by clicking the RIGHT mouse button while a client file is highlighted on the client list:
