CHAPTER 4. MERGING CLIENT INFORMATION & TEMPLATES
To complete a form you wish to produce, you need to merge your client's information with the "boilerplate" language of a form. In FormPAK™, the "boilerplate" language is called a TEMPLATE.
A TEMPLATE is a form without client information merged into it. A STATE TEMPLATE consists of "boilerplate" language as provided by the Washington State Pattern Forms Committee. You may also use a MODIFIED TEMPLATE or a CLIENT TEMPLATE -- state templates you have changed. When a TEMPLATE is merged with a CLIENT INFORMATION FILE, a MERGED FORM is created on your computer screen. With a client file active, begin by accessing the Merge Template window. The icon ![]() for accessing the Merge Template window is located near the upper left corner of your screen. The icon is also located on the top of the "General" tab after pressing FormPAK button
for accessing the Merge Template window is located near the upper left corner of your screen. The icon is also located on the top of the "General" tab after pressing FormPAK button ![]() on the Title Screen…
on the Title Screen…
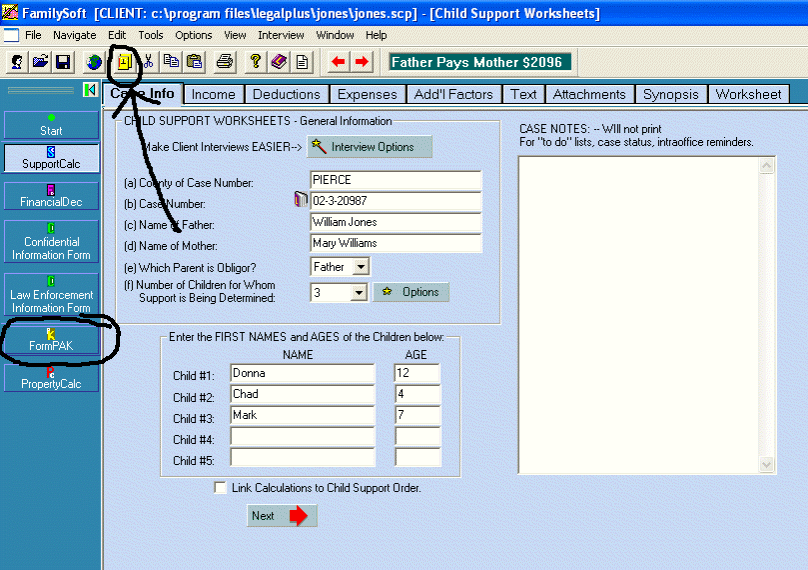
The Merge Template menu, as shown below, will appear:

The Merge Template MENU allows you to merge your CLIENT INFORMATION FILE with many different TEMPLATES. As you become more familiar with the program, you will save and retrieve your own modified versions of the TEMPLATES issued by the State.
Since you have not yet saved MODIFIED TEMPLATES, make sure that State Templates (as circled above) are selected. To load a State Template, highlight desired template from the list, then click the Merge Template button at the bottom of the window..
______________________________________________________________________________
- - - - - - - - - - - - - - - - - - FOR PRACTICE - - - - - - - - - - - - - - - - - - - -
Access the Merge Template window by clicking on the icon ![]() located on the upper toolbar or from the FormPAK™ General Tab. The Merge Template window will appear. Make sure the State Templates button is selected. Highlight the desired template from the list, and click the Merge Template button at the bottom of the window. Your selected template will merge with the current client’s information.
located on the upper toolbar or from the FormPAK™ General Tab. The Merge Template window will appear. Make sure the State Templates button is selected. Highlight the desired template from the list, and click the Merge Template button at the bottom of the window. Your selected template will merge with the current client’s information.
MERGING CLIENT INFORMATION & TEMPLATES II. Searching for a STATE TEMPLATE
II. Searching For a STATE TEMPLATE By Partial Title.
To assist you in quickly finding the form you need from the State Template Menu, a Search Function is available. Type a word, such as "Plan" in the white space next to the Search button:
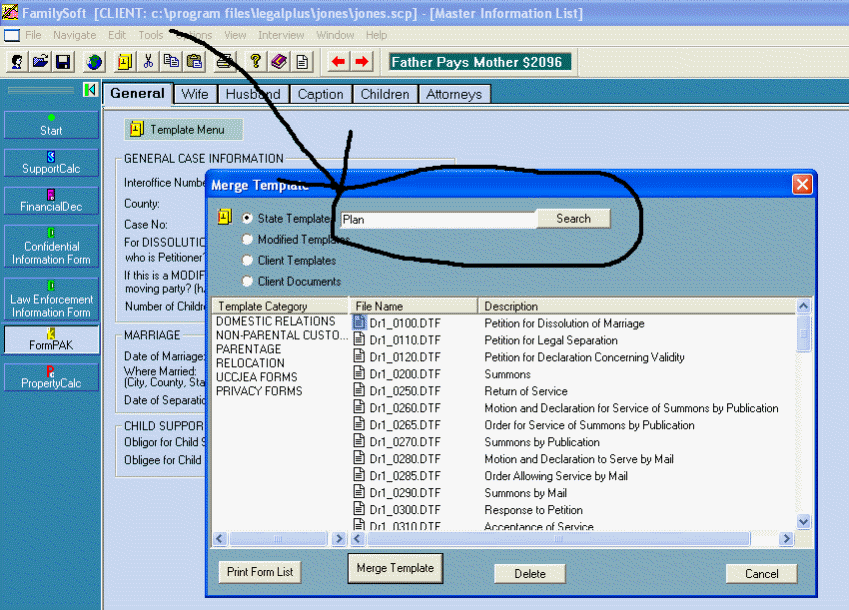
The Search Function
When you click "Search," FormPAK™ will compile a list of all forms using the search word you entered in its description. Using this shorter list, select the template you desire, and click on the Merge Template button, as before.)
______________________________________________________________________________- - - - - - - - - - - - - - - - - - FOR PRACTICE - - - - - - - - - - - - - - - - - - - -
While viewing the Merge Template window, type a word contained in the description of the template you desire. Click on the Search button. FormPAK™ will compile a list of all forms using the search word you entered in its description. Using this shorter list, select the template you desire, and click on the Merge Template button to merge your desired template.
MERGING CLIENT INFORMATION & TEMPLATES III. Creating a MERGED FORM
After selecting a TEMPLATE and clicking Merge Template, a MERGED FORM will appear on the screen:
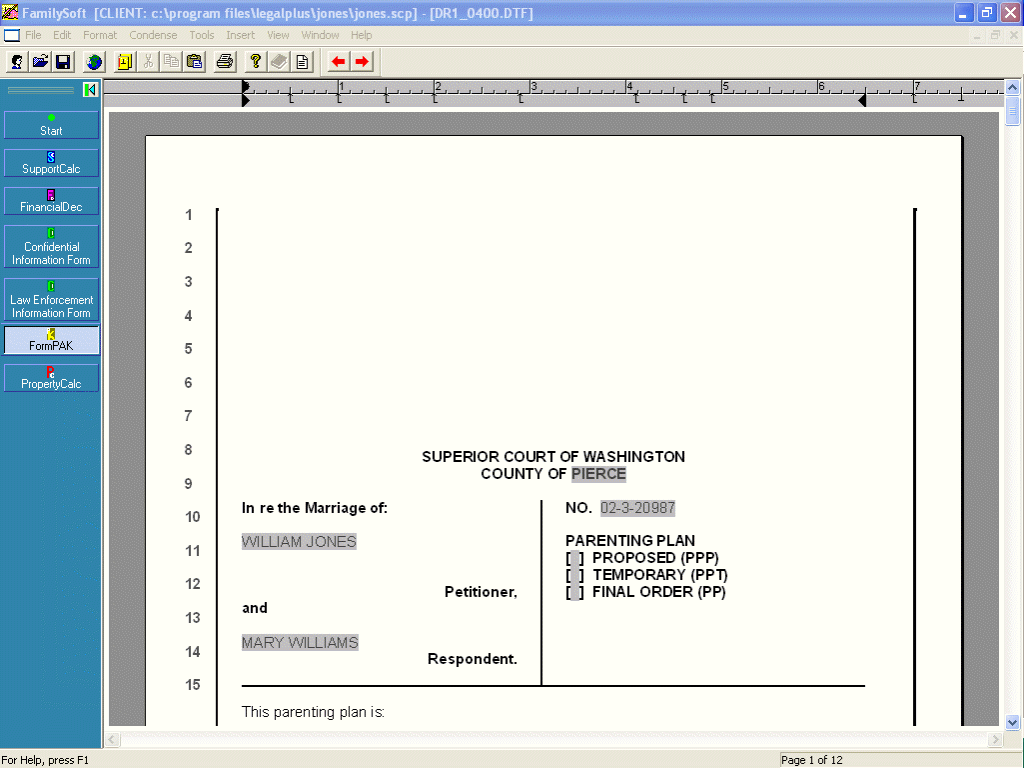
You can now scroll down through the MERGED FORM. The MERGED FORM is a combination of the CLIENT INFORMATION FILE and the TEMPLATE you selected. The two files have only been merged on the screen. Therefore, you have the power to change one or both of these files independently. You independently add to the contents of the CLIENT INFORMATION FILE, and/or change the TEMPLATE to better meet your needs.
Eventually, you may want to create a DOCUMENT for final editing or archiving. We will discuss DOCUMENTS in a later chapter.
______________________________________________________________________________
- - - - - - - - - - - - - - - - - - FOR PRACTICE - - - - - - - - - - - - - - - - - - - -
After selecting the desired TEMPLATE, Click the Merge Template button. On the screen will appear the MERGED FORM, which is a combination of the CLIENT INFORMATION FILE, and the TEMPLATE you chose. Use your mouse, the UP or DOWN keys, the Page Up and Page Down keys to scroll through the MERGED FORM. The F10 key will move form variable to variable.
MERGING CLIENT INFORMATION & TEMPLATES IV. Adding Info to a MERGED FORM
IV. Adding Client Information to a MERGED FORM.
The FormPAK™ MASTER INFORMATION LIST supplies a large amount of the information needed for a case. More information is needed, however, to complete the specific questions on particular forms. You can supply this information by typing right on the screen while viewing the MERGED FORM.
As you scroll through the MERGED FORM, you will notice the "blanks" in the form are highlighted in gray. These are areas where client information appears. The program "remembers" any information you type in these highlighted areas and then automatically transfers the information to other forms calling for that same information.
CLIENT INFORMATION & TEMPLATES V. Adding to or Editing the TEMPLATE
V. Adding to or Editing the TEMPLATE.
You also have the ability to make changes to the TEMPLATE text and spaces, and then to save these changes as a CLIENT TEMPLATE, or a MODIFIED TEMPLATE. You have complete control over your ability to edit either the TEMPLATE areas or the CLIENT INFORMATION areas. Add or subtract additional words, change spaces by adding or subtracting hard returns. Just remember the difference between the CLIENT INFORMATION areas and the TEMPLATE areas on the screen. The following will help with this distinction:

Client information is ALWAYS contained in a gray area: an input box, a checkbox, or a textbox (usually below the word "Other"). ALL OTHER areas of the merged form are TEMPLATE areas. POSITION of the cursor determines which file you are affecting…
______________________________________________________________________________
- - - - - - - - - - - - - - - - - - FOR PRACTICE - - - - - - - - - - - - - - - - - - - -
Move the cursor into a gray are of the form. Anything typed here saves as part of the client’s information. Now, move the cursor out of the gray area. Anything typed here changes the template, which can then be saved as either a client template or a modified template…
MERGING CLIENT INFORMATION & TEMPLATES VI. Condensing the MERGED FORM
VI. Condensing the MERGED FORM.
The Washington State Pattern Forms Committee issued several criteria concerning the form's appearance and substance.
Rule 2 clearly states, "On computer generated forms, only those options which are applicable to a case need be included on the form."
The CONDENSE option of FormPAK™ provides a neat way to streamline a document and delete text which does not apply to a specific case. Before condensing, when you have checked the boxes appropriate to your case, your MERGED FORM will look similar to this:
 Uncondensed Text – Condense Button circled
Click on the ![]() button.
button.
Now, let's see the MERGED FORM in its CONDENSED form . . .
After pressing the CONDENSE button ![]() , the boxes not selected will disappear and leave only those chosen selections. Like this:
, the boxes not selected will disappear and leave only those chosen selections. Like this:
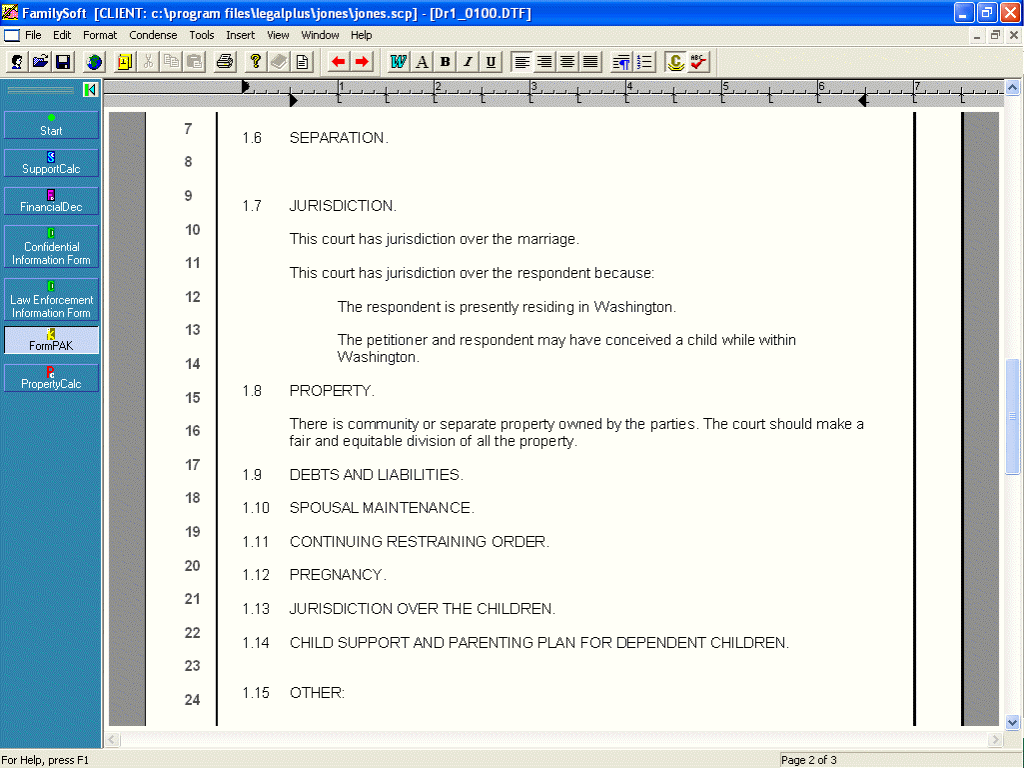
If you press ![]() again, all of the boxes and removed text will reappear.
again, all of the boxes and removed text will reappear.
______________________________________________________________________________
- - - - - - - - - - - - - - - - - - FOR PRACTICE - - - - - - - - - - - - - - - - - - - -
While in a MERGED FORM, press the ![]() . Notice that all check boxes, and all text not checked disappears. Press
. Notice that all check boxes, and all text not checked disappears. Press ![]() again. The boxes and the previously condensed out text reappears.
again. The boxes and the previously condensed out text reappears.
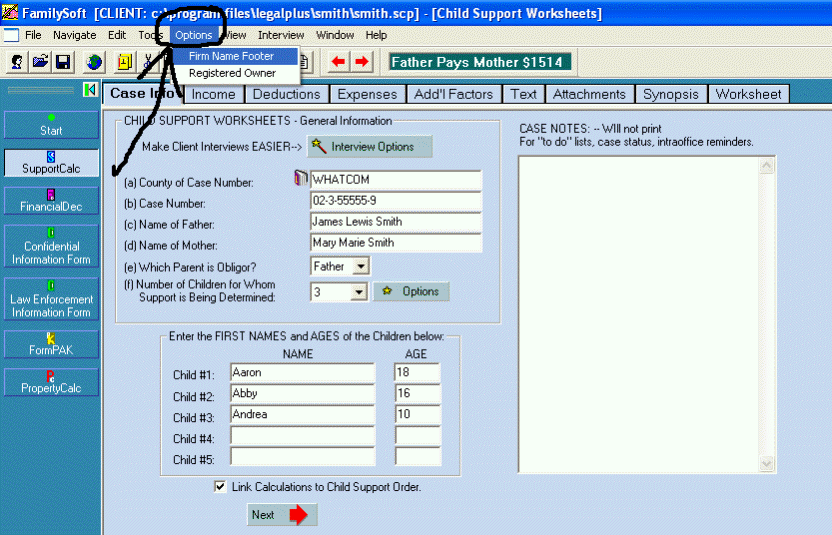
Before you get very much further, you will want to setup your Firm Name Footer, which will print out on the lower right side of each page of the mandatory forms. The Firm Name Footer set-up is accessed under the word Options on the upper toolbar
A window will open, and look like this:
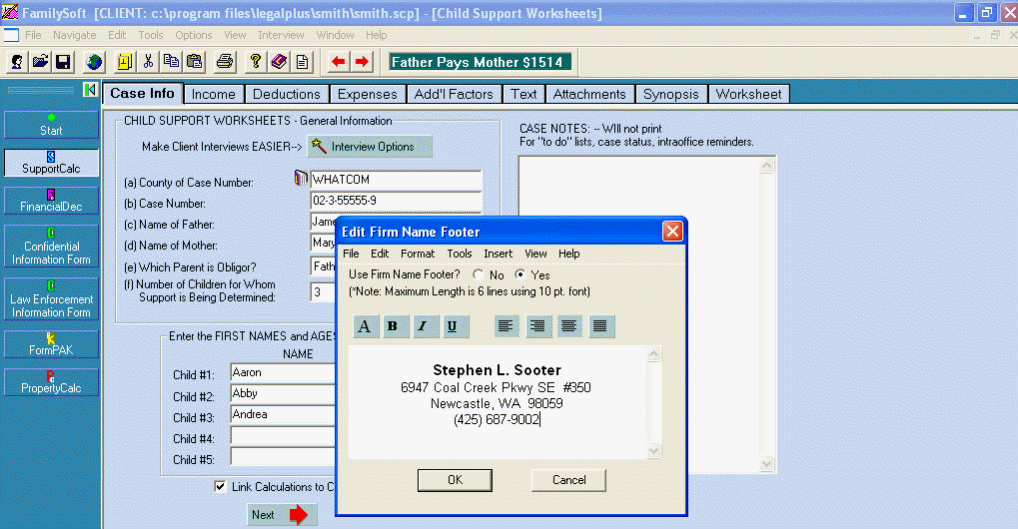
The FIRM FOOTER SET-UP Window
The window for the Firm Name Footer allows you to enter a new or edit an existing Firm Name Footer, which will print at the right bottom of each page of the forms for any client.
______________________________________________________________________________
- - - - - - - - - - - - - - - - - - FOR PRACTICE - - - - - - - - - - - - - - - - - - - -
Click on Options on the top toolbar. Highlight Firm Name Footer click. The Firm Name Footer window will appear on your screen.
You have many options for configuring your Firm Name Footer. You can select the font of your choice, word attribute (Bold, Underline, Italics), and choose whether to center the text, right justify or left justify. In addition, you can insert a graphical image in the form of a bitmap. You can also choose to turn off the option of printing the Firm Name Footer altogether.
______________________________________________________________________________
- - - - - - - - - - - - - - - - - - - - - FOR PRACTICE - - - - - - - - - - - - - - - - - - - - -
Type in your firm's information, as described above. Use your existing pleading paper as a guide. Or, be creative and make a Firm Name Footer that is customized to your current needs. When you are done, click the OK button to save your changes. Print the current page and view your new Firm Name Footer by File, then Print.